

Build Log: Mega Planter Enhancements
A couple of years ago, I built some Mega Planters in our backyard. We had our first real growing season last year which was both successful (I think? we’re definitely not good at plants) and highlighted a few areas for improvement. Over the off-season, I’ve been planning and plotting how to tackle some of the improvements, just waiting for the warmer weather to come around…
Quick Links
Where we started
The previous growing season highlighted two problematic areas:
Watering:
The cheap soaker hoses failed (which meant we had to resort to manual watering) however,
The super-leafy nature of zucchini meant that it was really hard to [easily] get water to the base/roots
We often had some standalone planters out in front of the mega-planters (say, for some flowers) — there was no way to integrate the automatic watering for these, so we’d have to manually water them anyways
Plant supports in general: this was a rabbit hole of problems.
The initial problem was that the electric fence posts were not nearly as sturdy as I thought they would be or rather, I grossly underestimated the loading that our tomatoes would exert (mostly because I had never had tomatoes survive long enough to be problematic before)
As a stop-gap, I bought some heavy-duty stake options. Individually, these were great — this solved the flexing problem, but this was an O(n) solution to support all of the tomatoes.
I thought I’d be clever by running some taut lines between the stakes and then supporting the tomatoes across the span. Obviously that was going to sag as there was no easy way to keep the two end-stakes from caving in on each other (I wasn’t about tether things down with guy-wires)


Rough Design
Watering
I think the root cause of the soaker-hose failure was running it without any pressure reduction: measuring the pressure at the final fitting was giving me 50-60psi - nothing on the packaging of the soaker hose suggested that it needed a pressure reduction.
This is an easy fix: buy a pressure regular to bring the pressure down to 25psi. In theory, by getting the pressure down, this should keep the soaker hoses from failing in the future. I had bought an extra set of flat soaker hoses so I could put those in the planters and be done with it, but I was never really happy with watering pattern. There was no elegant way to get the coverage I needed with a soaker hose (and especially a flat hose) — they just don’t do twists and turns well.
I debated going one step further: switching to round soaker hoses and then using fittings to do the turns. Getting a kit was fairly affordable, but it was the fittings that were the death of me: they were expensive, hard to find, and I couldn’t be sure if they would fit. This really, was the kick in the pants I needed to reconsider drip-irrigation.
When I had previously looked at (and previously used) drip-irrigation, I was turned-off by the pain it was to work with: having to jam a dinky 1/4” hose onto a barbed fitting was not fun. Looking at this from a “I may have to reconfigure the watering for next season” (and thinking about the aggravating labour) was a no-go for me.
Thankfully, I found that you can get push-connect fittings; and with hose being cheap, I would be less bothered if I had to reconfigure my watering layout next season.
As a final just-in-case, I bought a small articulating watering wand should I have a need to have to manually water something. The wand is handy because last year, I discovered that zucchini is prickly.
Irrigation Plan
Plant Supports
I had the opportunity to buy some 4ft (1/2” diameter) and 6ft (1” diameter) fibreglass stakes made by Miracle Gro at surplus prices. Compared to my bulk 4ft (1/4” diameter) fibreglass stakes, these are definitely tanky stakes. Definitely good to have for some individual plant supports (say, our cantaloupe or watermelon). But I wanted something more MinMax for the tomatoes.
The beefiness of the T-stakes was sufficient, the challenge really, was keeping the two posts from collapsing in on each other.
A rough diagram of what happens when the mass of tomatoes sags along a support string between two posts
Simply put, if there was a way to jam a horizontal bar at the top, between the two T-posts, this would keep the posts from collapsing on each other. The tricky part is how to actually make that stretcher; I had some options
Obviously, if welding was something I could do, this problem would mostly go away but I’m working with my skill-set
Take a large diameter PVC or ABS pipe, drill a hole at both ends, on one side only — this would allow the pipe to sit on top of the T-post, without falling through. Using some strapping, we can probably strap the pipe down onto the T-post. The problem with this is that the entire structure is dependant on the pipe not warping/sagging due to heat from sun-exposure (stuffing cut-down lumber into the pipe should nearly eliminate the sag). In theory, this solution would work but I wouldn’t know until I built and tested it — and large diameter piping is expensive
Using some end-rail t-clamps we could probably rig up something using EMT or even another T-post
As I was writing up this post, I discovered that T-post brackets are a thing and I think this, with some pressure treated wood, would be great. I could even put in four T-posts and build a cage of sorts
I briefly considered working with cattle panel and then said hell-no
Whatever solution I came up with had an additional constraint: it must be done in such a way that it can be dismantled so that I can tarp over the planters in the winter).
The solution I came up with was to just build a one-segment chain link fence:
The fencing hardware is already built for outdoors
Parts the mostly standardized
The chain-link portion could act as the support lattice structure for the plants as they grew taller
The only tricky part that remains is figuring out how to disassemble this for winterizing the planters. For that, I needed to add a socket into the planter box essentially. Although potentially an eyesore for some, a couple of 5-gallon buckets with concrete could totally solve this problem: the fence would be “outside” of the planter-box, so the winterization effort would be negligible.
I had a thought that perhaps umbrella stands could fit the fence posts: some umbrella stands will support 1.9”/2” diameter umbrellas, and my main-post was 1-7/8” (1.875”) — close enough that I wanted to triple check with my own eyes before committing to it (spoiler: it fits).
Step 1 - Installing the umbrella stands
Moving away from using a T-stake means that I have to do some more thinking about how to get the umbrella stand into the planter box — without losing a ton of volume/surface area to the umbrella stand. There are a few options:
A ‘normal’ umbrella stand (ballpark 18” diameter)
Roughly 255 sq. inch footprint
Fence post is minimum ~9” inset from the edge of the planter
Roughly $50 each for me
A ‘half’ umbrella stand
Roughly 122 sq. inch footprint
If you place the umbrella stand smart, you can have the fence post only a couple inches from the edge of the planter
Roughly $60 each for me
A ‘deck mount’ umbrella stand. This is just the ‘socket’ piece — I would have to bolt this to ‘something’ and bury that. The advantage is that I get to control what I attach it to. I debated going with a plastic cutting board but ended up going with brick because I already had extras on hand.
Variable footprint
Depending on where you mount it (relative to the base) you can have the fence post only a couple inches from the edge of the planter. Also by adjusting where and how you mount it, you can better control which axis the base resists tipping on
Roughly $30 each for me. There is an additional cost of mounting hardware and the brick (or cutting board etc.) as well
For cost savings, I ultimately went with the deck mount option.


One thing that I will have to keep my eye on is the bolt used to secure the umbrella/post: “the thread replacement screw is made of high-quality black plastic and stainless steel” — but after only a few days, it’s showing signs of rust.
Step 2 - Mounting the chainlink
While you can do this solo, don’t. Having an extra set of hands makes this so much less stressful. Even with an extra set of hands (and a couple extra ladders), this was still a handful. Maybe there’s a good reason people don’t build chain-link fences suspended in the air? I wasn’t able to capture the individual steps because we simply had our hands totally full. You can get the gist of what needs to be done on YouTube. As a highlight though:
Measure the span between the end-post-assemblies (measure from the inside-of-the-cup) and using a grinder, cut the top-rail to the desired size. We did this in a few passes, slowly getting to the final size. A cordless bandsaw would have made this so much easier (I don’t have one - yet) but after a couple test cuts, we got some pretty clean results: I head the grinder steady (using the guard a a stable reference edge) and Nicole slowly rotated the rail
After getting the size right, I hit the cutoff end of the top-rail with a flap disc to clean it up and sprayed a bit of black Plastidip to try and protect it
We got super lucky in that we had an extra length of chain-link fence (this is referred to as the ‘fabric’) available and I didn’t have to buy any — it would have been $180 for a 50ft span (!!)
To size it, Nicole held one end of the fabric against the main-post as firmly as she could and I stretched it out to the other end, pulling against her until I could only hand-squeeze the diamond grids about 1/4”. We made note of which link it was and unravelled the fabric at that link
With Nicole holding the span of fabric midair, I struggled to get the tension-band installed. We first did two tension bands on one side first (just to get it attached), then we randomly ran fabric-ties to help take the weight before then moving to the far side and struggling to get the tension band on that side. This is particularly challenging because we simultaneously need to pull against the main post (in order to tension it) but we couldn’t really pull too hard because the post isn’t really “anchored”. Again, this is probably why people don’t built fences suspended midair, inside planter boxes…
We then looked up how to actually tie the fabric ties and then tied every other link since we are planning on weight-loading the chain-link with tomatoes (and really, the ties come in a pack of 50)
I debated running a tension-wire on the bottom but decided to use a top-bar there as well, essentially turning this into a big frame. There is a hope that come end of season, we can ‘lift the entire thing out’ (without having to disassemble anything) and then in the spring, we can “just put it back in” — I’m not about to take it out now to find out. Again I ran fabric ties on nearly every other link across the bottom as well


Step 3 - Drip irrigation planning
The biggest advantage of going with drip irrigation over a soaker hose is that I can add random drops at will, if needed. When picking out parts, I specifically wanted to start with a kit and then add more stuff to it (even overlapping). This lets me build out extra parts and try new things if needed without having to worry about running out of parts (and they are fairly cheap anyways — at least the entry level cheapo stuff I bought).
A lot of the videos and guides I’ve seen have all of the ‘configuration’ hooked up at the hose-bib. Doing things this way has a lot of advantages:
Since everything is in series, you only need to buy one of everything
Hiding a black 1/2” mainline hose is infinitely easier to do than a bright green garden hose (and substantially cheaper). I would also get to ‘reclaim’ my garden hose
With strategic use of tees, elbows and shutoffs, I can have control per-planter


However, I did not go with this method. Instead, I kept all of my existing runs and made the drip-irrigation changes after the 4-way-manifold.


This has the additional expense of having to buy +2 pressure regulators and hose connection assemblies but it gives me a couple advantages:
Reclaiming the garden hose isn’t a priority since I already bought another one anyways — the hose that connects to the last port on the manifold has enough reach to allow me to run the sprinkler in the yard if needed (and it is certainly easier to ‘stuff the hose back in a milk crate’ than it would be to neatly spool the hose back at the house)
More importantly, by doing things this way, I have the option of swapping over to soaker hoses should this not work out in the long run (and if it does work out, I’m only out the cost of a couple pressure regulators)
I suppose, I could have done a combination of the two, trading the cost of two additional regulators and hose connectors vs the cost of tees, elbows and shutoffs:
Another potential option
If I like the drip irrigation (preliminary opinion suggests that I will), I can certainly revisit the plumbing of the planters next year. For the time being, by doing things the way I did, should things not work out — I can very easily transition back to using soaker hoses (now with pressure regulators in place).
Step 4 - Drip irrigation hookup
Going with push-connect everything made this super relaxing to work with: eyeball, cut, push, repeat. If I end up staying with this, I may get some 1/4 elbows to reduce some of the arcing of the 1/4 tube but for this season, it’s fine.


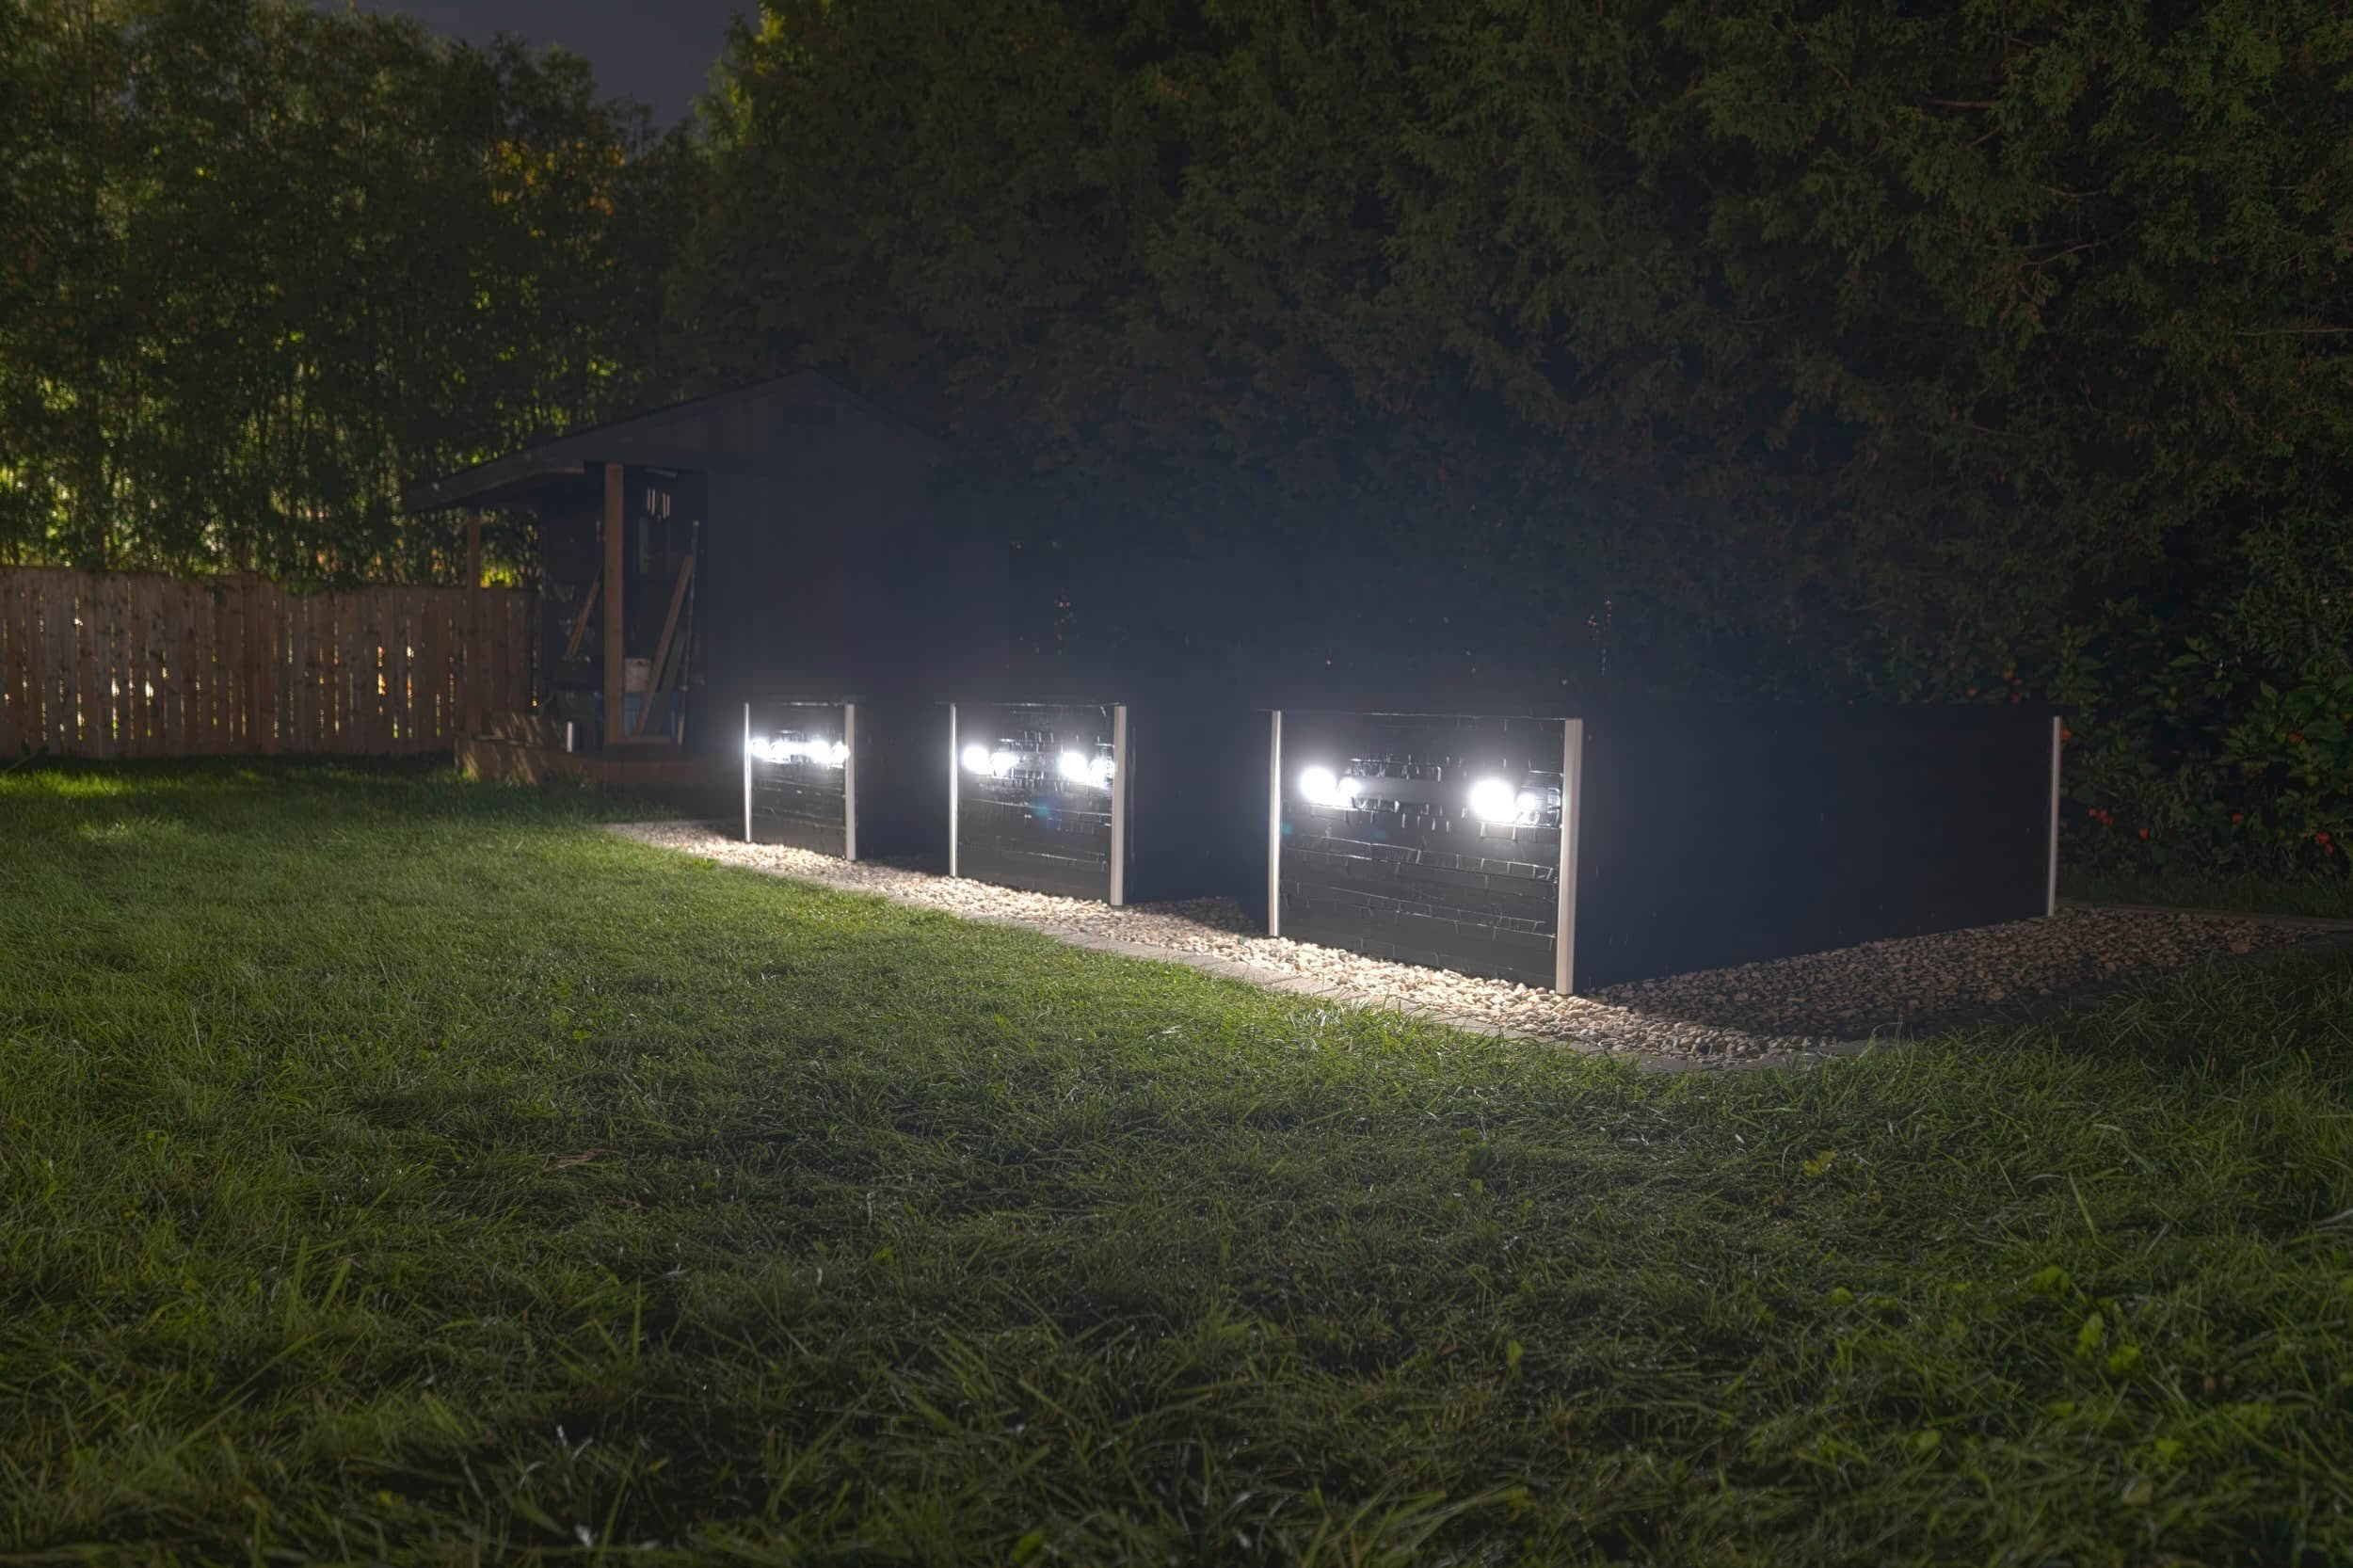
Milestone
This was intended to be a very quick project — and it was. Everything came together in a matter of a couple of days (I spent most of the time waiting for packages to arrive more than anything). Now that I’m done (for now), it’s super satisfying to step back and see how everything works together.
As the plants get bigger, I’ll have to dial up the amount of water being pushed out (or run the timer for longer — but that assumes all of the plants grow at the same pace), but for now, this is in a good state.
All done for now!
Assuming that everything works out as well as they should (on paper), I have some plans for the next refresh
Revisiting the plumbing between the house and the planters — you can see the bright green hose in the background ha
Going down the rabbit-hole of tying this into home automation — soil moisture sensors and local-first water controllers
Right now I don’t have a filter in place — because I didn’t feel like buying three filters (and didn’t know if putting it in-series, above the 4-way-manifold would be problematic). When I revisit, I’ll probably add a filter.
Exciting!
Mixups, surprises and lessons learned
This project mostly went without a hitch but there are a couple small things of note:
While I am super happy about how the chain link fence turned out, had I known about T-post brackets, I think I totally would have gone down that route. While it certainly would be a ton easier to build that, I think I would lose out on the versatility of the chain-link fence — you can see how the dinky 4-ft stakes are braced into the fence above, making them super sturdy.
One thing that will be problematic is the water timer: I have a mechanical timer which works great — if you need a ‘big chunky time span’ (the tick mark is at 15-minutes). But shorter bursts of water (say 5-minutes) don’t work so good: the spring doesn’t even engage. I’ll need to switch to a digital (or at least, non-spring-driven) timer to improve upon this.
Appendix - Parts!
Chain Link Fence
The parts generally come in ‘black’ and a grey galvanized look — I went with the black as it fit better aesthetically (although it also is the more durable option). Since I’m only building literally one panel, the cost difference doesn’t matter.
Fence
$22 each - Two 7-1/2 ft, 1-7/8 main post
$24 each - Two 10-1//4 ft, 1-1/4 top rail
$2 each - Four rail-end-assemblies
$3 each - Two tension bars for 48” fabric
$1 each - Six 1-7/8 tension bands (you need at least three tension bars for 4ft fabric and four tension bars for 5ft fabric)
$1 each - Two 1-7/8 post caps
$9 each - Pack of fencing ties
$128 each - 4ft x 50ft chain link fabric (Free for us since we had enough on hand)
Umbrella stand base
$30 each - Two deck mount umbrella stands
$22 each - Pack of 1/4 x 1-3/4 stainless Tapcons
$7 each - Pack of stainless 1/4 washers
$7 each - Two Oldcastle Townsend wall blocks (Free for us since we had them on hand)
Total cost: $240 (for us)
If we hadn’t, by sheer luck, had the chain link fabric on hand, I would have opted to go with the taller 5ft fabric and I would have reached out to fencing companies to see if I could get a measly 6.5ft span of chain-link fabric instead of having to buy a whole roll. Alternatively, I would have considered
$37 - PVC lattice
$48 - 16ga welded rabbit fence
$70 - 12.5ga welded fence
Drip Irrigation
I probably could have saved some money going with just the kit and/or a different parts
$65 - A starter kit that used push-connect fittings
$17 - 1/2” mainline to 3/4” garden hose adapter (my kit came with one, but I needed two more)
$15 each - Three 25-psi pressure regulators
$24 - 1/2” mainline elbow
$28 - 1/4” in-line shut-off
$10 - 1/2” mainline end-cap
$8 - Back-flow preventer (not convinced I need this, but oh well, it was cheap and my topology allowed me to get just one)
$22 - Bulk pack adjustable pass-through emitters
$35 - Bulk pack of adjustable emitters
Total cost: $330 (with lots of extra parts)
Mega Planters
The mega-planters I built a couple years ago that I’m building up from
Product links may be affiliate links: MinMaxGeek may earn a commission on any purchases made via said links without any additional cost to you.