

Fixing Synology ‘Untrusted Certificate’
With HTTPS is enabled, whenever I access the management portal for my NAS, I get a very well-intentioned warning about how the certificate isn’t trusted and how all the baddies could be trying to bust into my NAS. I have dutifully clicked the Advanced ➞ Proceed anyways option but this has been bugging me for a while now and I finally got around to fixing this nuisance.
Quick Links
Starting Point
Everytime I navigate to my NAS’s management portal, Chrome makes sure to tell me how my connection isn’t private and that attackers are lurking around the corner and while it’s not a huge deal to just carry on, it’s a nuisance.
My NAS isn’t open to the internet, I don’t use the QuickConnect functionality and have no desire to go down that road - if that’s something you want, Synology has a KB article on it. For users that don’t want this, it’s initially an exercise in frustration because Google search results will yield two types of results:
How to setup LetsEncrypt to handle SSL certificates for your NAS or
How to setup a self-signed certificate for your NAS
The latter option sounds great until you realize that this functionality was only available in DSM6. Surely, we can’t let this stop us!
The easy options
There are a few easy options
It’s not a big deal, just do the Advanced ➞ Proceed dance every time
If you’re only ever accessing the management portal from your local network, maybe turn off HTTPS? Is it really necessary after all?
Utilize site-settings to allow insecure content
Since I use HTTPS Everywhere, turning off HTTPS doesn’t really work for me so realistically, I’m left with the last option. This workaround doesn’t make the problem go away but can reduce the nuisance-factor. By leveraging Site Settings, we can override the behavior for the management portal site specifically. Just scroll down and set Insecure content to Allow and that’s it!
After setting this to Allow, I noticed that I was prompted once about the super insecure site and then I wasn’t bothered again for a long time. You still get the ‘Not Secure’ flag in the address bar so this still bugs the hell out of me.
To fix this, we’ll need to “make the certificate valid”. At a high level, this has three stages:
Become a Certificate Authority (CA)
Create a certificate for the NAS
Install the certificate for the NAS
Seems easy enough.
Of course, to make things more challenging, I’m opting to do this purely in Windows since I just don’t want to spin up and maintain a virtual Linux environment just for this. If you’re more versed with Linux, this may flow a bit more naturally for you.
Step 1 - Pre-requisites
Working within Windows (and not counting WSL or anything), before we can do anything, we have to get the openssl tools. Pick whichever precompiled binary you feel comfortable with (specifically, I went with the ‘Light installer’ option).
During installation, I opted to copy the binaries to the \bin folder, rather than the \Windows directory.
We will be working entirely out of the \bin folder, so go ahead and open a Command Prompt window and navigate to our \bin folder
Step 2 - Become a CA
At a high level, we want to create a private key (protected by a password) and then, using that private key, go ahead and create a [public] certificate.
[A] Generate a private key
We don’t need to become a full-fledged CA, we just need the bits and pieces absolutely necessary just so we can create some certs. In our working folder, go ahead and create a file ‘pass.txt’. This file should contain a strong password as this is what secures our CA. By using a separate file to store the password, we can just refer to this file instead of having to type the password out again and again,
OpenSSL has two commands that will create a private key for us: genpkey and the older (but still valid) genrsa. In the following sample, I’ve opted for 4096-bit keys (because, heck, why not).
openssl genpkey -algorithm RSA -pass file:pass.txt -out ca-key.pem -pkeyopt rsa_keygen_bits:4096 -aes256
openssl genrsa -aes256 -passout file:pass.txt -out ca-key.pem 4096
Running this command will create a ca-key.pem file in our working folder. We can verify that the private key is good by using the following command:
openssl rsa -in ca-key.pem -check -noout -passin file:pass.txt
If all goes well, the output should be: RSA key ok
[B] Create our root certificate
We can use the ca-key.pem private key we just created, to create our root certificate. Here, I opted for 10-year expiry on the root certificate.
openssl req -new -x509 -sha256 -days 3650 -passin file:pass.txt -key ca-key.pem -out ca.pem
When we run this command, we will be prompted to provide some information. I opted to specify the country and the common-name, leaving everything else as blank
[C] Install the Root Certificate
By installing the root certificate on our machine(s), any certificates signed by this root-certificate are automatically trusted. On Windows it’s probably easiest to first convert the certificate:
openssl x509 -outform der -in ca.pem -out ca.der
This creates a more familiar certificate file in oor working folder - install this into the Trusted Root Certificates store. You can do this per-user or per-machine (I opted to do per-machine).
Recap
At this point we have a few files in our working folder:
- pass.txt - This file contains the password that we secure our private key with.
- ca-key.pem - This is the private key for the CA
- ca.pem - This is the public facing certificate
- ca.der - This is the public facing certificate, in a different format. For Windows users, this will be the file we install on each machine
With these files, we are now a certificate authority and we can sign downstream certificates! Make sure we put these files in a safe spot somewhere.
Step 3 - Create the signed certificate
[A] Get the CSR from DSM
So the first thing to do is get the Certificate Signing Request (CSR) from our NAS Management portal. Instructions may vary for different versions of DSM but for 7.1x, the steps are:
Log into the NAS
Open Control Panel
Open Security
Select Certificate
Click Settings
Click Advanced
Click Create certificate signing request (CSR)


Creating the CSR requires you to fill out some information — I opted to set the private key length to be the same as everything else so far (4096), and for the common name, I set it as one of the hostnames for my NAS.
DSM will prompt you to download a zip with two files in it:
server.key — this is the key that we need to sign using our CA
server.csr — this contains the settings we just filled out when creating the CSR
The server.csr file, as exported, is intended for us to send to a third party (paid) certificate authority to then sign (and they can’t help us with local IPs anyways) so we won’t actually need that file, we’ll make our own csr in a moment.
[B] Create our own CSR
From the archive.zip we just downloaded, extract the server.key file to our working directory. Before we totally forget what this file is, I would strongly suggest renaming it to something you might have a better chance of remembering: echo_server.key. We ca use this file to create our own CSR.
openssl req -new -key echo_server.key -out echo_server.csr
[C] Special sauce
Create a file in our working directory, echo_config.txt and add the following text. Adjust the DNS/IP entries to match the values you have set for your NAS.
DNS entries: add as many as you want here — whatever friendly label you want to associate with your NAS.
You can use just a simple hostname (i.e., echo) or you can use a ‘more proper’ FQDN (i.e., echo.lan)
Note that you can have a bunch of names here as well (although most people, I imagine, will be okay with one or two)
IP entries: whatever IP addresses are associated with your NAS, add them here.
If you want to plan for the future, you can preemptively add IP addresses for planned-upgrades down the road here too! What I mean by this is, for example, my NAS (DS1817+) has a PCIE expansion slot and right now, I have a 1x10Gig NIC in there (192.168.15.1) — down the road, I might add replace this NIC with a 2x10G so it might be prudent for me to also preemptively add the IP for that second NIC (192.168.15.2)
authorityKeyIdentifier=keyid,issuer
basicConstraints=CA:FALSE
keyUsage = digitalSignature, nonRepudiation, keyEncipherment, dataEncipherment
subjectAltName = @alt_names
[alt_names]
DNS.1 = echo
DNS.2 = echo10
IP.0 = 192.168.10.1
IP.1 = 192.168.10.2
IP.2 = 192.168.10.3
IP.3 = 192.168.10.4
IP.4 = 192.168.15.1
IP.5 = 192.168.15.2
To break down the values I used here in my example, my NAS currently has five NICs, spread across two DNS/host entries:
I have ‘echo’ and ‘echo10’ representing the labels I want to associate with my NAS for accessing via 1G and 10G.
I added four IPs for the four 1G NICs on my NAS (192.168.10.1, 192.168.10.2, 192.168.10.3, 192.168.10.4)
I added one IP for the single 10G NIC currently on my NAS (192.168.15.1)
Since I know I want to one day upgrade by 1x10G NIC for a 2x10G NIC, I preemptively added an additional IP for that (192.168.15.2)
This is a V3 certificate extension config file and as it might suggest, this allows us to associate link all of those DNS/IP entries to the certificate we are about to create.
[D] Sign the NAS certificate
Now we have everything in place to finally create our signed NAS certificate:
openssl x509 -req -in echo_server.csr -CA ca.pem -CAkey ca-key.pem -CAcreateserial -out echo_signed.pem -days 3650 -sha256 -extfile echo_config.txt -passin file:pass.txt

Recap
So at this point, we have a bunch of files in our working folder:
pass.txt - This file contains the password that we secure our private key with.
ca-key.pem - This is the private key for the CA
ca.pem - This is the public facing certificate
ca.der - This is the public facing certificate, in a different format. For Windows users, this will be the file we install on each machine
echo_server.key - This is the server.key file downloaded from our NAS when we clicked 'Create certificate signing request (CSR)
echo_server.csr - This is the CSR we created from the echo_server.key file (instead of using the file in the archive we downloaded)
echo_config.txt - A custom file we put together to define the different DNS/IP values to be associated with the signed certificate
echo_signed.pem - This is the signed certificate! This is the echo_server.key file, signed by our CA
Step 4 - Add signed certificate to DSM
In DSM, we can now add the signed key:
Log into the NAS
Open Control Panel
Open Security
Select Certificate
Click Add


Note
I’ve noted sometimes that the add operation can go into a limbo state where it’s ‘working’ — give it a minute and if there’s no progress, reload the portal page and re-add it.
After you’ve added the cert, there’s just one step needed. Under Settings ➞ Advanced, set (or verify) the System default certificate is the certificate you just added.
If you have multiple NAS units that you want to fix this for, repeat Step 3-4 for each one. When you reload the browser, the insecure warning will be gone!
Since you’re not likely going to deal with this for a long time, I’d recommend making some copious notes itemizing what all of the files are and backing them all up somewhere because in 10 years, you’ll come back to this and have no idea what any of it is.
TLDR Steps
More-so a note for me when I have to revisit this down the road:
Install OpenSSL somewhere, navigate to the installation folder \bin
Create CA
Create a file, pass.txt with the strong password for private key in it
Create the private key: openssl genpkey -algorithm RSA -pass file:pass.txt -out ca-key.pem -pkeyopt rsa_keygen_bits:4096 -aes256
Verify the private key: openssl rsa -in ca-key.pem -check -noout -passin file:pass.txt
Use the private key to make our public root cert: openssl req -new -x509 -sha256 -days 3650 -passin file:pass.txt -key ca-key.pem -out ca.pem
Specify the country
Specify the Common Name
Everything else can be blank
Convert the root cert to the easier DER format: openssl x509 -outform der -in ca.pem -out ca.der
Install the ca.der certificate on the machines we will be accessing the NAS portal from
Get the CSR package from DSM
Log into DSM ➞ Control Panel ➞ Security ➞ Certificates
Settings ➞ Advanced ➞ Create certificate signing request (CSR) ➞ download this file (server.zip)
From server.zip, extract server.key to our working folder & rename it to something that makes more sense. The other file doesn’t matter
Create our own CSR: openssl req -new -key echo_server.key -out echo_server.csr
Create EXT file (echo_config.txt): Scroll up to see what goes in it
Sign the server key (from DSM) with our CA cert: openssl x509 -req -in echo_server.csr -CA ca.pem -CAkey ca-key.pem -CAcreateserial -out echo_signed.pem -days 3650 -sha256 -extfile echo_config.txt -passin file:pass.txt
Add the certificate to DSM (these steps may change in 10yrs ha, but for now in DSM7 this is what I did)
Log into DSM ➞ Control Panel ➞ Security ➞ Certificates
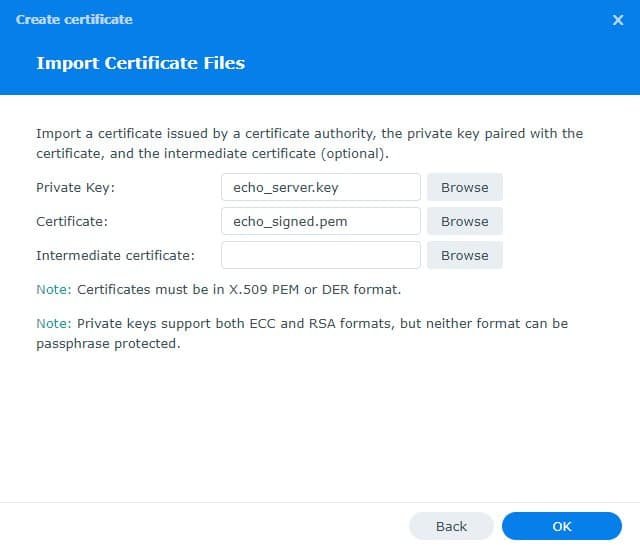
Add ➞ Private key = echo_server.key, Certificate = echo_signed.pem
Settings ➞ Advanced ➞ set System Default to the certificate we just added
Product links may be affiliate links: MinMaxGeek may earn a commission on any purchases made via said links without any additional cost to you.